UnityのAnimation RiggingでIK/FK切り替えスライダ付きのTwo Bone IKコンストレイントを作成する
はじめに
UnityのAnimation Riggingにはじめから付いているTwo Bone IKが使いにくかったので、改良したコンストレイントを作成しました。
前回はかんたんなコンストレイントを作るだけでしたが今回は実用的なものです。

- Unity: 2019.3.0b11
- Animation Rigging: 0.2.3-preview
モデルの準備
Make Humanで適当にボーンの入ったモデルを用意しました。

標準のTwo Bone IKを使ってみる
まずは標準で用意されているTwo Bone IKを利用してみます。
リグの構築
Unityの新しいプロジェクトを立ち上げます。 前回と同様の手順でAnimation Riggingをpackage managerからインストールします。
シーンにモデルを配置しました。


モデルのルートにAnimatorとRig Builderをアタッチします。

モデルのルートの下に空のGameObjectを作成しControlRigと名付けます。

RigコンポーネントをControlRigにアタッチし、Rig Builderに登録します。


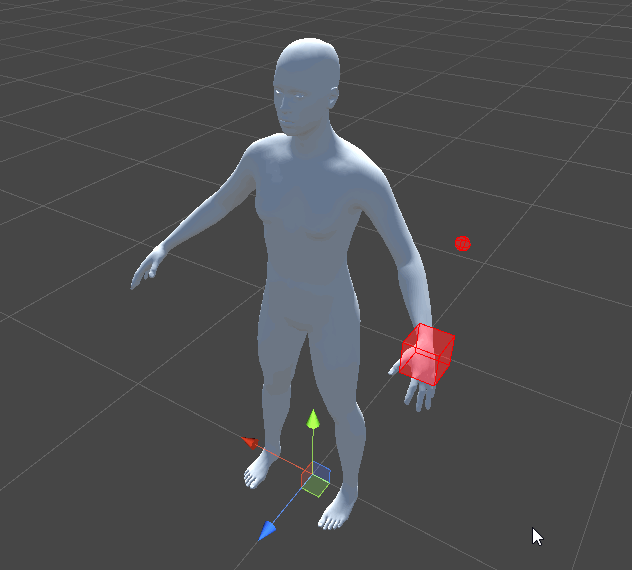
ControlRigの下に空のGameObjectを作成しLeftArmと名付けます。

LeftArmの下にGameObjectを2つ作り、それぞれLeftArmtargetCNTRL、LeftArmhintCNTRLと名付けます。

LeftArmにTwo Bone IK Constraintをアタッチします。 Root、mid、tipにそれぞれ上腕、下腕、手のボーンをアタッチします。 Source ObjectsのTargetとHintにさきほど作成したCNTRLオブジェクトを割り当てます。

LeftArmtargetCNTRLとLeftArmhintCNTRLをそれぞれ適切な位置に移動し、エフェクターを設定します。

Two Bone IK ConstraintのSettingsでNoneからPosition and Rotationに変更します。

うごかしてみる
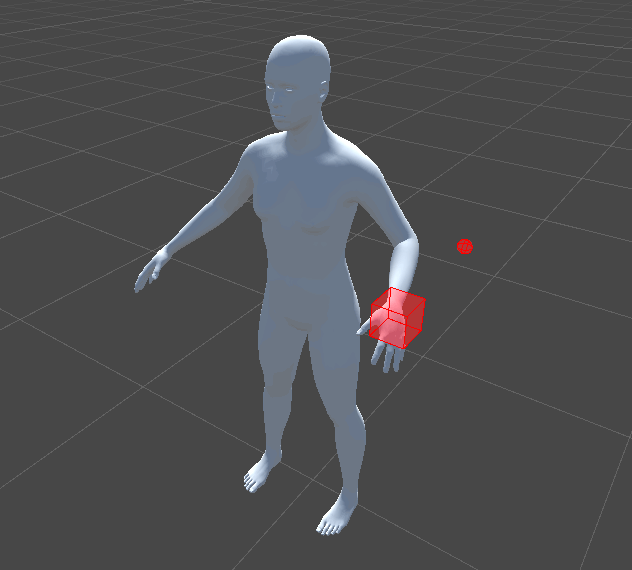
Playモードに入ってTargetやHintを適当に動かすとIKが働いているのがわかります。
まずは通常のボーンのアニメーションを作ってみます。 モデルのルートを選択してAnimationウィンドウからCreateします。

左腕の上腕、下腕、手、腰のボーンを追加しました。

アニメーションを付けるためにいったんRigの重みをオフにします。

適当に腕をふるアニメーションを付けました。

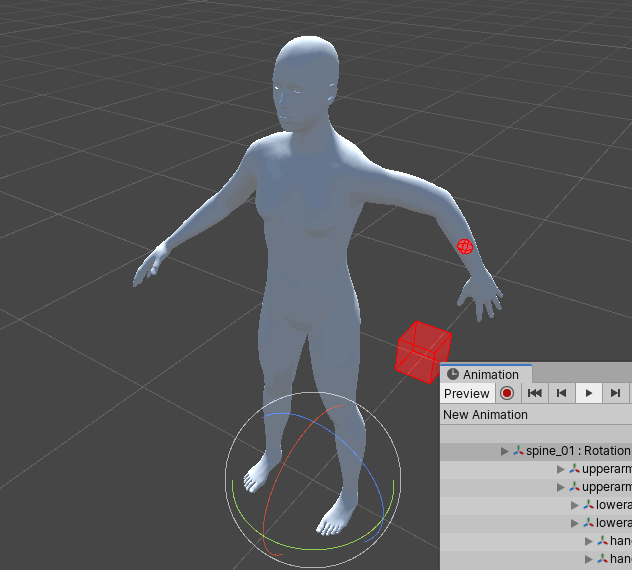
Rigの重みを1に戻します。

この状態で再生してみると次のようになります。

アニメーションが再生されたあとでIKの計算が追加でなされていることがわかります。
次にRigのアニメーションを用意します。 New Clipを作成します。

CNTRLオブジェクトを登録します。

適当なアニメーションを作成します。


Animatorウィンドウから新しいレイヤーを追加します。

新しいレイヤーにRigのアニメーションを与えます。

レイヤーのウエイトを1にします。

これでPlayモードに入ると次のようになります。
通常のアニメーションにIKのアニメーションをブレンドできました。
このようにRig用のLayerを用意してアニメーションさせるのはUnityが考えている使い方のようです。
次のリポジトリでは忍者がラーメンを食べるアニメーションがRig Overrideレイヤーで実現されていました。
次のブログ記事でもRig用のレイヤーを用意していました。
高度な Animation Rigging:キャラクターとプロップのインタラクション – Unity Blog
問題点
このような形は、あらかじめモーションがあって、それに追加でIKを与えてプロシージャルにモーションを作る場合にはとても有効です。
しかし、アニメーションをいちからUnity上で作成したい場合、FKとIKを切り替えるためにレイヤーごとバラバラでアニメーションを作っていちいちRigのウエイトをオフにして、と操作するのは面倒です。 IKが向いているアニメーションとFKが向いているアニメーションというものがあり、アニメーションを作成する際にはそれらを切り替えブレンドしながら作業をしていくというのがよくあります。 よくあるリグのようにIK/FKの切り替えスライダのようなものを用意したくなります。
標準のTwo Bone IKではこの要求に答えてくれません。 後付でIKを与えるという用途に特化しています。
そこで今回はIK/FK切り替えスライダ付きのTwo Bone IKコンストレイントを作成していくことにします。
IK/FK切り替えスライダ付きのTwo Bone IKコンストレイント
Deform Boneに直接アニメーションを書き込むのはコントロールリグとでフォームボーンを分離するという観点から気持ちが悪いので、IKのCNTRLの他にFKのCNTRLオブジェクトも用意することにします。
新しいC#のスクリプトを作成し、「TwoBoneIKFKConstraint」という名前にします。

TwoBoneIKFKConstraint.csに次のように記述します。
using Unity.Burst;
using UnityEngine;
using UnityEngine.Animations;
using UnityEngine.Animations.Rigging;

[DisallowMultipleComponent, AddComponentMenu ("Animation Rigging/Custom/Two Bone IK FK Constraint")]
public class TwoBoneIKFKConstraint : RigConstraint<TwoBoneIKFKConstraintJob, TwoBoneIKFKConstraintData, TwoBoneIKFKConstraintBinder> { }

[BurstCompile]
public struct TwoBoneIKFKConstraintJob : IWeightedAnimationJob {

    public ReadWriteTransformHandle Root;
    public ReadWriteTransformHandle Mid;
    public ReadWriteTransformHandle Tip;

    public ReadOnlyTransformHandle IK_Target;
    public ReadOnlyTransformHandle IK_Hint;

    public ReadOnlyTransformHandle FK_Root;
    public ReadOnlyTransformHandle FK_Mid;
    public ReadOnlyTransformHandle FK_Tip;

    public ReadWriteTransformHandle Slider;

    public Vector2 LinkLengths;

    public FloatProperty jobWeight { get; set; }

    public void ProcessRootMotion (AnimationStream stream) { }

    public void ProcessAnimation (AnimationStream stream) {
        float w = jobWeight.Get (stream);

        var sliderPos = Slider.GetLocalPosition (stream);
        var t = Mathf.Clamp01 (sliderPos.y);
        Slider.SetLocalPosition (stream, new Vector3 (0, t, 0));

        if (w > 0f) {
            var rootRot = Root.GetRotation (stream);
            var midRot = Mid.GetRotation (stream);
            var tipRot = Tip.GetRotation (stream);

            var rootRotFK = Quaternion.Lerp (rootRot, FK_Root.GetRotation (stream), w);
            var midRotFK = Quaternion.Lerp (midRot, FK_Mid.GetRotation (stream), w);
            var tipRotFK = tipRot;

            AnimationRuntimeUtils.SolveTwoBoneIK (
                stream, Root, Mid, Tip, IK_Target, IK_Hint,
                posWeight : 1f * w,
                rotWeight : 0 * w,
                hintWeight : 1f * w,
                limbLengths : LinkLengths,
                targetOffset : AffineTransform.identity
            );
            var rootRotIK = Root.GetRotation (stream);
            var midRotIK = Mid.GetRotation (stream);
            var tipRotIK = Tip.GetRotation (stream);

            Root.SetRotation (stream, Quaternion.Lerp (rootRotFK, rootRotIK, t));
            Mid.SetRotation (stream, Quaternion.Lerp (midRotFK, midRotIK, t));
            Tip.SetRotation (stream, Quaternion.Lerp (tipRotFK, tipRotIK, t));
        }
    }
}

[System.Serializable]
public struct TwoBoneIKFKConstraintData : IAnimationJobData {

    public Transform Root;
    public Transform Mid;
    public Transform Tip;

    [SyncSceneToStream] public Transform IK_Target;
    [SyncSceneToStream] public Transform IK_Hint;

    [SyncSceneToStream] public Transform FK_Root;
    [SyncSceneToStream] public Transform FK_Mid;

    [SyncSceneToStream] public Transform Slider;

    public bool IsValid () => !(Tip == null || Mid == null || Root == null || IK_Target == null || FK_Root == null || FK_Mid == null || Slider == null);

    public void SetDefaultValues () {
        Root = null;
        Mid = null;
        Tip = null;
        IK_Target = null;
        IK_Hint = null;
        FK_Root = null;
        FK_Mid = null;
        Slider = null;
    }
}

public class TwoBoneIKFKConstraintBinder : AnimationJobBinder<TwoBoneIKFKConstraintJob, TwoBoneIKFKConstraintData> {

    public override TwoBoneIKFKConstraintJob Create (Animator animator, ref TwoBoneIKFKConstraintData data, Component component) {
        var job = new TwoBoneIKFKConstraintJob ();

        job.Root = ReadWriteTransformHandle.Bind (animator, data.Root);
        job.Mid = ReadWriteTransformHandle.Bind (animator, data.Mid);
        job.Tip = ReadWriteTransformHandle.Bind (animator, data.Tip);

        job.IK_Target = ReadOnlyTransformHandle.Bind (animator, data.IK_Target);
        if (data.IK_Hint != null)
            job.IK_Hint = ReadOnlyTransformHandle.Bind (animator, data.IK_Hint);

        job.FK_Root = ReadOnlyTransformHandle.Bind (animator, data.FK_Root);
        job.FK_Mid = ReadOnlyTransformHandle.Bind (animator, data.FK_Mid);

        job.Slider = ReadWriteTransformHandle.Bind (animator, data.Slider);

        job.LinkLengths[0] = Vector3.Distance (data.Root.position, data.Mid.position);
        job.LinkLengths[1] = Vector3.Distance (data.Mid.position, data.Tip.position);

        return job;
    }

    public override void Destroy (TwoBoneIKFKConstraintJob job) { }
}
リグの構築
さきほどのキャラクターは削除してしまいます。

あらたにリグの組まれていないまっさらなモデルを配置し直します。

モデルのルートにAnimatorとRig Builderをアタッチします。

モデルのルートの下にControlRigと名付けたGameObjectを配置します。

ControlRigにRigコンポーネントをつけて、Rig Builderに登録します。


ControlRigの下にLeftArmと名付けたGameObjectを生成します。

LeftArmの下にIKTargetpivotと名付けたGameObjectを作成し、左手のあたりに配置します。


IKTargetpivotの下にIKTargetCNTRLと名付けたGameObjectを配置します。

pivotの下にCNTRLを配置するのには理由があります。 pivotを用意しなくてもリグは問題なく動くでしょう。 しかし、pivotがない場合、デフォルト位置が中途半端な位置になります。

アニメーションを付ける最中にデフォルトの位置へ戻したくなったときに戻すのが難しくなります。
pivotをデフォルト位置において、pivotの下にCNTRLを配置すれば、CNTRLの(0, 0, 0)がデフォルトの位置や回転となりデフォルトに戻したくなったら0を入力するだけで済みます。

次にLeftArmの下にIKHintpivotと名付けたGameObjectを作成し、左肘の後ろの方に配置します。


IKHintpivotの下にIKHintCNTRLと名付けたGameObjectを配置します。

次にLeftArmの下にFKRootpivotと名付けたGameObjectを作成します。

FKRootpivotを選択しCtrlキーを押しながらモデルの上腕のボーン(ここではupperarm_l)を選択します。 選択する順番も重要です。

選択をしたら「Animation Rigging > Align Transform」を実行します。

これでFKRootpivotが腕のボーンに揃いました。

FKRootpivotの下にFKRootCNTRLと名付けたGameObjectを配置します。

次にFKRootCNTRLの下にFKMidpivotと名付けたGameObjectを作成します。

FKMidpivotを選択しCtrlキーを押しながらモデルの下腕のボーン(ここではlowerarm_l)を選択します。選択する順番も重要です。

Align Transformを実行します。これでFKMidpivotが腕のボーンに揃いました。

FKMidpivotの下にFKMidCNTRLと名付けたGameObjectを配置します。

次にLeftArmの下にSlider_pivotと名付けたGameObjectを作成し、適当に左腕の近くに配置します。


Slider_pivotのScaleのyを0.25にします。

Sliderpivotの下にSliderCNTRLと名付けたGameObjectを配置します。

LeftArmにさきほど作成したTwo Bone IK FK Constraintをアタッチします。

Dataに上腕、下腕、手のボーンとCNTRLオブジェクトを登録します。

CNTRLオブジェクトをシーンビューから選択できるようにEffectorを設定していきます。
Effector用に次のようなMeshをBlenderで作成しました。


Blenderからobjで書き出す際にInclude Edgesにチェックを入れます。

このメッシュを使うにはひと工夫が必要でした。 単純にobjに書き出してUnityで読み込もうとするとTriangleが存在しないため無視されてしまうようです。
UnityはMeshTopologyでLineStripにも対応しているのですが、標準のimporterではその設定が見当たりませんでした(quadの設定ならあるのですが)。
Unity - Scripting API: MeshTopology
そこでlineのメッシュをobjファイルから作成するEditor拡張を作成しました。
次のスクリプトをEditor/フォルダの下に配置します。
using System.Collections;
using System.Collections.Generic;
using System.IO;
using UnityEditor;
using UnityEngine;

public class LineObjToMesh : EditorWindow {
    [MenuItem ("Animation Rigging/Utils/Line Obj To Mesh")]
    static void Open () {
        GetWindow<LineObjToMesh> ("Line Obj To Mesh");
    }

    Object obj;

    void OnGUI () {
        obj = EditorGUILayout.ObjectField (obj, typeof (Object), false);
        if (GUILayout.Button ("Create Line Mesh")) {
            CreateLineMesh (obj);
        }
    }

    void CreateLineMesh (Object obj) {
        var path = AssetDatabase.GetAssetPath (obj);

        var vertices = new List<Vector3> ();
        var indices = new List<int> ();

        using (var reader = new StreamReader (path)) {
            string line;
            while ((line = reader.ReadLine ()) != null) {
                if (line.Length <= 0) continue;
                var l = line.Split (' ');
                switch (l[0]) {
                    case "v":
                        vertices.Add (new Vector3 (
                            float.Parse (l[1]),
                            float.Parse (l[2]),
                            float.Parse (l[3])
                        ));
                        break;
                    case "l":
                        indices.Add (int.Parse (l[1]) - 1);
                        indices.Add (int.Parse (l[2]) - 1);
                        break;
                    default:
                        break;
                }

            }
        }

        var mesh = new Mesh ();
        mesh.SetVertices (vertices);
        mesh.SetIndices (indices, MeshTopology.Lines, 0);

        var assetPath = Path.ChangeExtension (path, "asset");
        AssetDatabase.CreateAsset (mesh, assetPath);
    }
}
Lineで構成されたobjファイルをセットしてCreate Line Meshを実行します。

するとラインで構成されたMeshが生成されます。


このスクリプトはobjの読み込みを大分簡略化していて、Lineで構成されたオブジェクトが1つの場合しか考えていません。
IKTargetCNTRLにはBoxEffectorを設定しました。

IKHintCNTRLにはBallEffectorを設定しました。

上腕のFKRootCNTRLにはBlenderで作成したライン状のメッシュを設定しました。

下腕のFKMidCNTRLにもBlenderで作成したライン状のメッシュを設定しました。

Slider_CNTRLにはBallEffectorを設定しました。

Slider_pivotにBlenderで作成したIK/FK切り替えのフレームのメッシュを設定し適当に位置を揃えました。

これでリグが完成です。
うごかしてみる
Playモードに入ってCNTRLオブジェクトを動かすと期待どおりにリグが働くことを確認できます。
スライダを動かすことでIKとFKをスムーズに切り替えられています。
手の向きについては今回はコントロールしていません。 別途コントローラが必要になるでしょう。
デフォルトのTwo Bone IKでは、FKアニメーションをBaseレイヤーでつけて、追加でIKのモーションを別レイヤーでつけるといった形で作成する必要がありました。 今回作成したTwo Bone IK FKではIKとFKを同じリグでコントロールできます。 プロシージャルモーション用途であとからIKを追加するだけならば標準のTwo Bone IKでも問題ないでしょうが、 アニメーション作成にAnimation Riggingを作成する場合、今回作成したコンストレイントのほうが使いやすいと思います。
スクリプトの解説
Animation Rigginは例によって4つの部分からなっています。順番に見ていきます。
最初にRigConstraintを継承したコンポーネントのクラスです。
[DisallowMultipleComponent, AddComponentMenu ("Animation Rigging/Custom/Two Bone IK FK Constraint")]
public class TwoBoneIKFKConstraint : RigConstraint<TwoBoneIKFKConstraintJob, TwoBoneIKFKConstraintData, TwoBoneIKFKConstraintBinder> { }
見たとおりなので特に解説することはありません。
次にIweightedAnimationJobを継承した構造体です。
[BurstCompile]
public struct TwoBoneIKFKConstraintJob : IWeightedAnimationJob {

    public ReadWriteTransformHandle Root;
    public ReadWriteTransformHandle Mid;
    public ReadWriteTransformHandle Tip;

    public ReadOnlyTransformHandle IK_Target;
    public ReadOnlyTransformHandle IK_Hint;

    public ReadOnlyTransformHandle FK_Root;
    public ReadOnlyTransformHandle FK_Mid;
    public ReadOnlyTransformHandle FK_Tip;

    public ReadWriteTransformHandle Slider;

    public Vector2 LinkLengths;

    public FloatProperty jobWeight { get; set; }

    public void ProcessRootMotion (AnimationStream stream) { }

    public void ProcessAnimation (AnimationStream stream) {
        float w = jobWeight.Get (stream);

        var sliderPos = Slider.GetLocalPosition (stream);
        var t = Mathf.Clamp01 (sliderPos.y);
        Slider.SetLocalPosition (stream, new Vector3 (0, t, 0));

        if (w > 0f) {
            var rootRot = Root.GetRotation (stream);
            var midRot = Mid.GetRotation (stream);
            var tipRot = Tip.GetRotation (stream);

            var rootRotFK = Quaternion.Lerp (rootRot, FK_Root.GetRotation (stream), w);
            var midRotFK = Quaternion.Lerp (midRot, FK_Mid.GetRotation (stream), w);
            var tipRotFK = tipRot;

            AnimationRuntimeUtils.SolveTwoBoneIK (
                stream, Root, Mid, Tip, IK_Target, IK_Hint,
                posWeight : 1f * w,
                rotWeight : 0 * w,
                hintWeight : 1f * w,
                limbLengths : LinkLengths,
                targetOffset : AffineTransform.identity
            );
            var rootRotIK = Root.GetRotation (stream);
            var midRotIK = Mid.GetRotation (stream);
            var tipRotIK = Tip.GetRotation (stream);

            Root.SetRotation (stream, Quaternion.Lerp (rootRotFK, rootRotIK, t));
            Mid.SetRotation (stream, Quaternion.Lerp (midRotFK, midRotIK, t));
            Tip.SetRotation (stream, Quaternion.Lerp (tipRotFK, tipRotIK, t));
        }
    }
}
ProcessAnimation (AnimationStream stream)が今回作成したリグのメインの部分です。
最初にjobWeightを取得しています。
float w = jobWeight.Get (stream);次にスライダーの位置からIKとFKの混合割合のtを取得しています。 スライダーの位置をxとzは動かないように、yは01の区間に収まるように上書きもしています。
var sliderPos = Slider.GetLocalPosition (stream);
var t = Mathf.Clamp01 (sliderPos.y);
Slider.SetLocalPosition (stream, new Vector3 (0, t, 0));
ウエイトが0より大きい場合に後続の処理を行います。
最初にボーンの回転情報をそれぞれ取得します。
var rootRot = Root.GetRotation (stream);
var midRot = Mid.GetRotation (stream);
var tipRot = Tip.GetRotation (stream);
次にFKの回転を計算します。 jobWeightのwを使ってボーンの回転とFKコントローラの回転を混ぜています。
var rootRotFK = Quaternion.Lerp (rootRot, FK_Root.GetRotation (stream), w);
var midRotFK = Quaternion.Lerp (midRot, FK_Mid.GetRotation (stream), w);
var tipRotFK = tipRot;
次にIKの回転を計算します。
AnimationRuntimeUtils.SolveTwoBoneIK (
    stream, Root, Mid, Tip, IK_Target, IK_Hint,
    posWeight : 1f * w,
    rotWeight : 0 * w,
    hintWeight : 1f * w,
    limbLengths : LinkLengths,
    targetOffset : AffineTransform.identity
);
var rootRotIK = Root.GetRotation (stream);
var midRotIK = Mid.GetRotation (stream);
var tipRotIK = Tip.GetRotation (stream);AnimationRuntimeUtils.SolveTwoBoneIKは標準のTowBoneIkConstraintで使われているものです。
これはroot、mid、tipのいちを書き換える挙動をしているので、書き換えたあとの回転を取得してIKの回転としています。
最後にIKとFKの回転を混ぜて処理は終了です。
Root.SetRotation (stream, Quaternion.Lerp (rootRotFK, rootRotIK, t));
Mid.SetRotation (stream, Quaternion.Lerp (midRotFK, midRotIK, t));
Tip.SetRotation (stream, Quaternion.Lerp (tipRotFK, tipRotIK, t));次にIAnimationJobDataを継承した構造体です。
[System.Serializable]
public struct TwoBoneIKFKConstraintData : IAnimationJobData {

    public Transform Root;
    public Transform Mid;
    public Transform Tip;

    [SyncSceneToStream] public Transform IK_Target;
    [SyncSceneToStream] public Transform IK_Hint;

    [SyncSceneToStream] public Transform FK_Root;
    [SyncSceneToStream] public Transform FK_Mid;

    [SyncSceneToStream] public Transform Slider;

    public bool IsValid () => !(Tip == null || Mid == null || Root == null || IK_Target == null || FK_Root == null || FK_Mid == null || Slider == null);

    public void SetDefaultValues () {
        Root = null;
        Mid = null;
        Tip = null;
        IK_Target = null;
        IK_Hint = null;
        FK_Root = null;
        FK_Mid = null;
        Slider = null;
    }
}
見てのとおりですが、publicフィールドでTransformをシリアライズしています。
IsValidで有効になる場合を指定し、SetDefaultValuesでデフォルトの値を指定しています。
最後に`AnimationJobBinder`を継承したクラスです。
public class TwoBoneIKFKConstraintBinder : AnimationJobBinder<TwoBoneIKFKConstraintJob, TwoBoneIKFKConstraintData> {

    public override TwoBoneIKFKConstraintJob Create (Animator animator, ref TwoBoneIKFKConstraintData data, Component component) {
        var job = new TwoBoneIKFKConstraintJob ();

        job.Root = ReadWriteTransformHandle.Bind (animator, data.Root);
        job.Mid = ReadWriteTransformHandle.Bind (animator, data.Mid);
        job.Tip = ReadWriteTransformHandle.Bind (animator, data.Tip);

        job.IK_Target = ReadOnlyTransformHandle.Bind (animator, data.IK_Target);
        if (data.IK_Hint != null)
            job.IK_Hint = ReadOnlyTransformHandle.Bind (animator, data.IK_Hint);

        job.FK_Root = ReadOnlyTransformHandle.Bind (animator, data.FK_Root);
        job.FK_Mid = ReadOnlyTransformHandle.Bind (animator, data.FK_Mid);

        job.Slider = ReadWriteTransformHandle.Bind (animator, data.Slider);

        job.LinkLengths[0] = Vector3.Distance (data.Root.position, data.Mid.position);
        job.LinkLengths[1] = Vector3.Distance (data.Mid.position, data.Tip.position);

        return job;
    }

    public override void Destroy (TwoBoneIKFKConstraintJob job) { }
}CreateとDestroyをオーバーライドしています。
CreateではJobを作成しています。
var job = new TwoBoneIKFKConstraintJob ();そしてJobとDataのバインドを行っています。
job.Root = ReadWriteTransformHandle.Bind (animator, data.Root);
job.Mid = ReadWriteTransformHandle.Bind (animator, data.Mid);
job.Tip = ReadWriteTransformHandle.Bind (animator, data.Tip);

job.IK_Target = ReadOnlyTransformHandle.Bind (animator, data.IK_Target);
if (data.IK_Hint != null)
    job.IK_Hint = ReadOnlyTransformHandle.Bind (animator, data.IK_Hint);

job.FK_Root = ReadOnlyTransformHandle.Bind (animator, data.FK_Root);
job.FK_Mid = ReadOnlyTransformHandle.Bind (animator, data.FK_Mid);

job.Slider = ReadWriteTransformHandle.Bind (animator, data.Slider);HintはAnimationRuntimeUtils.SolveTwoBoneIKではオプションとなっています。
Hintがdataに登録されていない場合はBindをしないようにしています。
if (data.IK_Hint != null)
    job.IK_Hint = ReadOnlyTransformHandle.Bind (animator, data.IK_Hint);
IKの計算で使われる腕の長さも計算しています。
job.LinkLengths[0] = Vector3.Distance (data.Root.position, data.Mid.position);
job.LinkLengths[1] = Vector3.Distance (data.Mid.position, data.Tip.position);
最後にjobを返しています。
return job;おわりに
Animation Riggingでアニメーション作成に使っていけそうなIK/FKコンストレイントを作成しました。 ちゃんと拡張できるように作られていてありがたいですね。
https://github.com/MatchaChoco010/UnityAnimationRiggingTwoBoneIKFKConstraint