VGG16をファインチューニングして犬猫判別器を作成しGitHub Pagesで公開する
はじめに
「PythonとKerasによるディープラーニング」という本にしたがって VGG16をファインチューニングして犬猫判別器を作りました。 そしてその犬猫判別器をTensorFlow.jsを利用してブラウザ上で動作するようにし、 GitHub Pagesで公開しました。 その過程をメモします。
ブラウザ上で動く猫と犬の判別器ができた。https://t.co/zG6ZKU9hBA pic.twitter.com/ImTwPVEuUe
— 折登 いつき (@MatchaChoco010) 2019年2月4日
Google Colaboratoryでモデルの構築と訓練を行う
モデルの構築と訓練にはGoogle Colaboratoryを利用しました。 Google Colaboratoryについては次の記事の紹介が参考になります。
【秒速で無料GPUを使う】深層学習実践Tips on Colaboratory - Qiita
モデルの構築と訓練については本と同じです。
Kaggleのdogs vs catsのページからデータセットをダウンロードします。 Kaggleへの登録が必要なようです。
dogs-vs-cats.zipをダウンロードしたらGoogle Driveに入れます。
Google Colaboratoryで次のようにします。
from google.colab import drive
drive.mount('/gdrive')認証をすると/gdrive/My Drive/にGoogle Driveがマウントされます。
!を先頭につけるとシェルコマンドが実行できるので!unzipで展開をします。
!unzip "/gdrive/My Drive/dogs-vs-cats.zip"test1..zipとtrain.zipができるのでもう一段階unzipします。
!unzip -q "*.zip"trainの中を見るとcat.0.jpg~cat.12499.jpgとdog.0.jpg~dog.12499.jpgが
入っていることがわかります。
!ls traincat.0.jpg cat.3250.jpg cat.7751.jpg dog.12250.jpg dog.5500.jpg
cat.10000.jpg cat.3251.jpg cat.7752.jpg dog.12251.jpg dog.5501.jpg
cat.10001.jpg cat.3252.jpg cat.7753.jpg dog.12252.jpg dog.5502.jpg
cat.10002.jpg cat.3253.jpg cat.7754.jpg dog.12253.jpg dog.5503.jpg
cat.10003.jpg cat.3254.jpg cat.7755.jpg dog.12254.jpg dog.5504.jpg
cat.10004.jpg cat.3255.jpg cat.7756.jpg dog.12255.jpg dog.5505.jpg
cat.10005.jpg cat.3256.jpg cat.7757.jpg dog.12256.jpg dog.5506.jpg
cat.10006.jpg cat.3257.jpg cat.7758.jpg dog.12257.jpg dog.5507.jpg
cat.10007.jpg cat.3258.jpg cat.7759.jpg dog.12258.jpg dog.5508.jpg
...このtrainのなかからファインチューニング用に訓練画像1000枚ずつと
検証、テスト用に500枚ずつ、4000枚の画像を利用します。
次のようなディレクトリ構成にします。
cats_and_dogs_small
├─ train
│  ├─ cats
│  └─ dogs
├─ validation
│  ├─ cats
│  └─ dogs
└─ test
   ├─ cats
   └─ dogs
import os, shutil
# The path to the directory where the original
# dataset was uncompressed
original_dataset_dir = 'train'
# The directory where we will
# store our smaller dataset
base_dir = 'cats_and_dogs_small'
os.mkdir(base_dir)
# Directories for our training,
# validation and test splits
train_dir = os.path.join(base_dir, 'train')
os.mkdir(train_dir)
validation_dir = os.path.join(base_dir, 'validation')
os.mkdir(validation_dir)
test_dir = os.path.join(base_dir, 'test')
os.mkdir(test_dir)
# Directory with our training cat pictures
train_cats_dir = os.path.join(train_dir, 'cats')
os.mkdir(train_cats_dir)
# Directory with our training dog pictures
train_dogs_dir = os.path.join(train_dir, 'dogs')
os.mkdir(train_dogs_dir)
# Directory with our validation cat pictures
validation_cats_dir = os.path.join(validation_dir, 'cats')
os.mkdir(validation_cats_dir)
# Directory with our validation dog pictures
validation_dogs_dir = os.path.join(validation_dir, 'dogs')
os.mkdir(validation_dogs_dir)
# Directory with our validation cat pictures
test_cats_dir = os.path.join(test_dir, 'cats')
os.mkdir(test_cats_dir)
# Directory with our validation dog pictures
test_dogs_dir = os.path.join(test_dir, 'dogs')
os.mkdir(test_dogs_dir)
# Copy first 1000 cat images to train_cats_dir
fnames = ['cat.{}.jpg'.format(i) for i in range(1000)]
for fname in fnames:
src = os.path.join(original_dataset_dir, fname)
dst = os.path.join(train_cats_dir, fname)
shutil.copyfile(src, dst)
# Copy next 500 cat images to validation_cats_dir
fnames = ['cat.{}.jpg'.format(i) for i in range(1000, 1500)]
for fname in fnames:
src = os.path.join(original_dataset_dir, fname)
dst = os.path.join(validation_cats_dir, fname)
shutil.copyfile(src, dst)
# Copy next 500 cat images to test_cats_dir
fnames = ['cat.{}.jpg'.format(i) for i in range(1500, 2000)]
for fname in fnames:
src = os.path.join(original_dataset_dir, fname)
dst = os.path.join(test_cats_dir, fname)
shutil.copyfile(src, dst)
# Copy first 1000 dog images to train_dogs_dir
fnames = ['dog.{}.jpg'.format(i) for i in range(1000)]
for fname in fnames:
src = os.path.join(original_dataset_dir, fname)
dst = os.path.join(train_dogs_dir, fname)
shutil.copyfile(src, dst)
# Copy next 500 dog images to validation_dogs_dir
fnames = ['dog.{}.jpg'.format(i) for i in range(1000, 1500)]
for fname in fnames:
src = os.path.join(original_dataset_dir, fname)
dst = os.path.join(validation_dogs_dir, fname)
shutil.copyfile(src, dst)
# Copy next 500 dog images to test_dogs_dir
fnames = ['dog.{}.jpg'.format(i) for i in range(1500, 2000)]
for fname in fnames:
src = os.path.join(original_dataset_dir, fname)
dst = os.path.join(test_dogs_dir, fname)
shutil.copyfile(src, dst)データの準備ができたので、次にモデルを構築します。 VGG16のモデルを読み込みます。
from keras.applications import VGG16

conv_base = VGG16(weights='imagenet',
                  include_top=False,
input_shape=(150, 150, 3))include_topをFalseとすることで上位の層を取り除いて下位の層を使います。
conv_base.summary()_________________________________________________________________
Layer (type) Output Shape Param #
=================================================================
input_1 (InputLayer) (None, 150, 150, 3) 0
_________________________________________________________________
block1_conv1 (Conv2D) (None, 150, 150, 64) 1792
_________________________________________________________________
block1_conv2 (Conv2D) (None, 150, 150, 64) 36928
_________________________________________________________________
block1_pool (MaxPooling2D) (None, 75, 75, 64) 0
_________________________________________________________________
block2_conv1 (Conv2D) (None, 75, 75, 128) 73856
_________________________________________________________________
block2_conv2 (Conv2D) (None, 75, 75, 128) 147584
_________________________________________________________________
block2_pool (MaxPooling2D) (None, 37, 37, 128) 0
_________________________________________________________________
block3_conv1 (Conv2D) (None, 37, 37, 256) 295168
_________________________________________________________________
block3_conv2 (Conv2D) (None, 37, 37, 256) 590080
_________________________________________________________________
block3_conv3 (Conv2D) (None, 37, 37, 256) 590080
_________________________________________________________________
block3_pool (MaxPooling2D) (None, 18, 18, 256) 0
_________________________________________________________________
block4_conv1 (Conv2D) (None, 18, 18, 512) 1180160
_________________________________________________________________
block4_conv2 (Conv2D) (None, 18, 18, 512) 2359808
_________________________________________________________________
block4_conv3 (Conv2D) (None, 18, 18, 512) 2359808
_________________________________________________________________
block4_pool (MaxPooling2D) (None, 9, 9, 512) 0
_________________________________________________________________
block5_conv1 (Conv2D) (None, 9, 9, 512) 2359808
_________________________________________________________________
block5_conv2 (Conv2D) (None, 9, 9, 512) 2359808
_________________________________________________________________
block5_conv3 (Conv2D) (None, 9, 9, 512) 2359808
_________________________________________________________________
block5_pool (MaxPooling2D) (None, 4, 4, 512) 0
=================================================================
Total params: 14,714,688
Trainable params: 14,714,688
Non-trainable params: 0
_________________________________________________________________このモデルの上に全結合層を重ねます。
from keras import models
from keras import layers

model = models.Sequential()
model.add(conv_base)
model.add(layers.Flatten())
model.add(layers.Dense(256, activation='relu'))
model.add(layers.Dense(1, activation='sigmoid'))model.summary()_________________________________________________________________
Layer (type) Output Shape Param #
=================================================================
vgg16 (Model) (None, 4, 4, 512) 14714688
_________________________________________________________________
flatten_1 (Flatten) (None, 8192) 0
_________________________________________________________________
dense_3 (Dense) (None, 256) 2097408
_________________________________________________________________
dense_4 (Dense) (None, 1) 257
=================================================================
Total params: 16,812,353
Trainable params: 16,812,353
Non-trainable params: 0
_________________________________________________________________まずはVGG16を凍結して追加した全結合層を訓練します。
conv_base.trainable = False画像を読み込むImageDataGeneratorを用意します。
ImageDataGeneratorはcats/やdogs/といったディレクトリからクラスを判断してくれます。
訓練データの方はデータ拡張をいろいろ指定しています。
from keras.preprocessing.image import ImageDataGenerator


base_dir = 'cats_and_dogs_small'

train_dir = os.path.join(base_dir, 'train')
validation_dir = os.path.join(base_dir, 'validation')
test_dir = os.path.join(base_dir, 'test')


train_datagen = ImageDataGenerator(
      rescale=1./255,
      rotation_range=40,
      width_shift_range=0.2,
      height_shift_range=0.2,
      shear_range=0.2,
      zoom_range=0.2,
      horizontal_flip=True,
      fill_mode='nearest')

test_datagen = ImageDataGenerator(rescale=1./255)

train_generator = train_datagen.flow_from_directory(
        train_dir,
        target_size=(150, 150),
        batch_size=20,
        class_mode='binary')

validation_generator = test_datagen.flow_from_directory(
        validation_dir,
        target_size=(150, 150),
        batch_size=20,
        class_mode='binary')
モデルをコンパイルして訓練します。
model.compile(loss='binary_crossentropy',
              optimizer=optimizers.RMSprop(lr=2e-5),
              metrics=['acc'])

history = model.fit_generator(
      train_generator,
      steps_per_epoch=100,
      epochs=30,
      validation_data=validation_generator,
      validation_steps=50,
      verbose=2)
Train on 2000 samples, validate on 1000 samples
Epoch 1/30
2000/2000 [==============================] - 1s 669us/step - loss: 0.5793 - acc: 0.6865 - val_loss: 0.4344 - val_acc: 0.8270
Epoch 2/30
2000/2000 [==============================] - 1s 435us/step - loss: 0.4158 - acc: 0.8225 - val_loss: 0.3542 - val_acc: 0.8590
...
Epoch 30/30
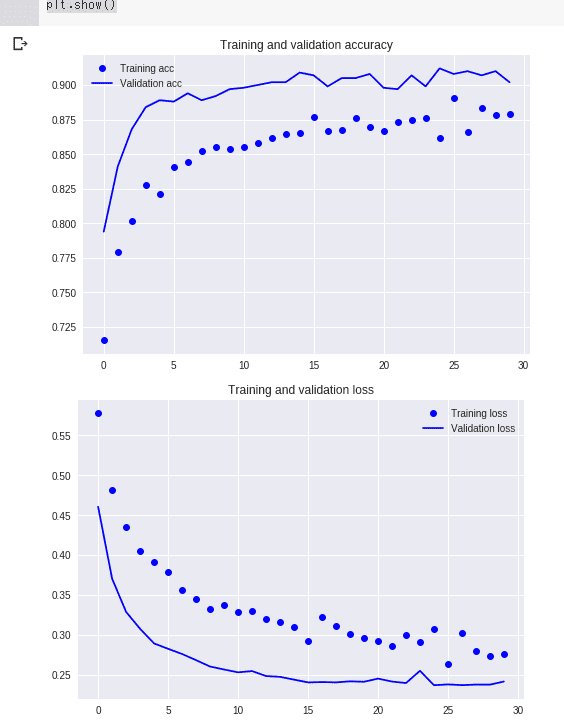
2000/2000 [==============================] - 1s 421us/step - loss: 0.0770 - acc: 0.9780 - val_loss: 0.2445 - val_acc: 0.8970ヒストリを見てみます。
acc = history.history['acc']
val_acc = history.history['val_acc']
loss = history.history['loss']
val_loss = history.history['val_loss']

epochs = range(len(acc))

plt.plot(epochs, acc, 'bo', label='Training acc')
plt.plot(epochs, val_acc, 'b', label='Validation acc')
plt.title('Training and validation accuracy')
plt.legend()

plt.figure()

plt.plot(epochs, loss, 'bo', label='Training loss')
plt.plot(epochs, val_loss, 'b', label='Validation loss')
plt.title('Training and validation loss')
plt.legend()

plt.show()

ここからVGG16の一部の凍結を解凍して学習させます。
conv_base.summary()_________________________________________________________________
Layer (type) Output Shape Param #
=================================================================
input_1 (InputLayer) (None, 150, 150, 3) 0
_________________________________________________________________
block1_conv1 (Conv2D) (None, 150, 150, 64) 1792
_________________________________________________________________
block1_conv2 (Conv2D) (None, 150, 150, 64) 36928
_________________________________________________________________
block1_pool (MaxPooling2D) (None, 75, 75, 64) 0
_________________________________________________________________
block2_conv1 (Conv2D) (None, 75, 75, 128) 73856
_________________________________________________________________
block2_conv2 (Conv2D) (None, 75, 75, 128) 147584
_________________________________________________________________
block2_pool (MaxPooling2D) (None, 37, 37, 128) 0
_________________________________________________________________
block3_conv1 (Conv2D) (None, 37, 37, 256) 295168
_________________________________________________________________
block3_conv2 (Conv2D) (None, 37, 37, 256) 590080
_________________________________________________________________
block3_conv3 (Conv2D) (None, 37, 37, 256) 590080
_________________________________________________________________
block3_pool (MaxPooling2D) (None, 18, 18, 256) 0
_________________________________________________________________
block4_conv1 (Conv2D) (None, 18, 18, 512) 1180160
_________________________________________________________________
block4_conv2 (Conv2D) (None, 18, 18, 512) 2359808
_________________________________________________________________
block4_conv3 (Conv2D) (None, 18, 18, 512) 2359808
_________________________________________________________________
block4_pool (MaxPooling2D) (None, 9, 9, 512) 0
_________________________________________________________________
block5_conv1 (Conv2D) (None, 9, 9, 512) 2359808
_________________________________________________________________
block5_conv2 (Conv2D) (None, 9, 9, 512) 2359808
_________________________________________________________________
block5_conv3 (Conv2D) (None, 9, 9, 512) 2359808
_________________________________________________________________
block5_pool (MaxPooling2D) (None, 4, 4, 512) 0
=================================================================
Total params: 14,714,688
Trainable params: 0
Non-trainable params: 14,714,688
_________________________________________________________________block5_conv1以降を解凍します。
conv_base.trainable = True

set_trainable = False
for layer in conv_base.layers:
    if layer.name == 'block5_conv1':
        set_trainable = True
    if set_trainable:
        layer.trainable = True
    else:
        layer.trainable = False
学習をさせます。
model.compile(loss='binary_crossentropy',
              optimizer=optimizers.RMSprop(lr=1e-5),
              metrics=['acc'])

history = model.fit_generator(
      train_generator,
      steps_per_epoch=100,
      epochs=100,
      validation_data=validation_generator,
      validation_steps=50)
Epoch 1/100
100/100 [==============================] - 29s 287ms/step - loss: 0.3022 - acc: 0.8645 - val_loss: 0.2290 - val_acc: 0.9010
Epoch 2/100
100/100 [==============================] - 27s 268ms/step - loss: 0.2608 - acc: 0.8860 - val_loss: 0.1984 - val_acc: 0.9160
Epoch 3/100
100/100 [==============================] - 27s 268ms/step - loss: 0.2219 - acc: 0.9010 - val_loss: 0.2147 - val_acc: 0.9130
...
Epoch 100/100
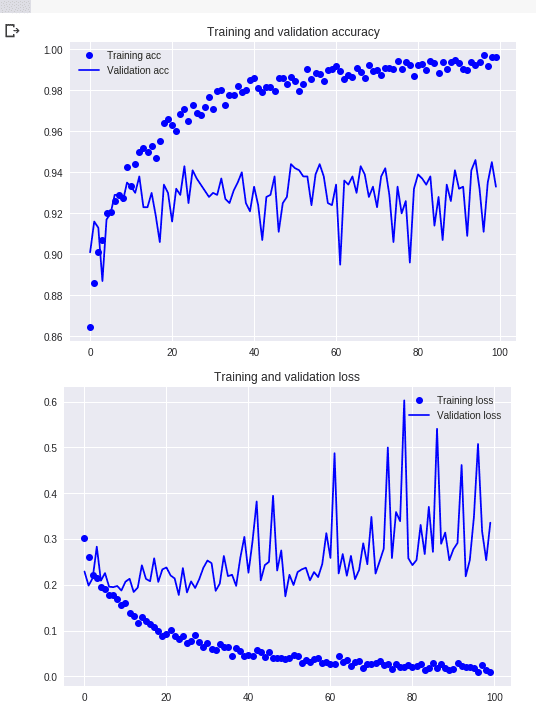
100/100 [==============================] - 27s 266ms/step - loss: 0.0092 - acc: 0.9960 - val_loss: 0.3356 - val_acc: 0.9330ヒストリを見てみます。
acc = history.history['acc']
val_acc = history.history['val_acc']
loss = history.history['loss']
val_loss = history.history['val_loss']

epochs = range(len(acc))

plt.plot(epochs, acc, 'bo', label='Training acc')
plt.plot(epochs, val_acc, 'b', label='Validation acc')
plt.title('Training and validation accuracy')
plt.legend()

plt.figure()

plt.plot(epochs, loss, 'bo', label='Training loss')
plt.plot(epochs, val_loss, 'b', label='Validation loss')
plt.title('Training and validation loss')
plt.legend()

plt.show()

テストデータで正解率を出してみます。
test_generator = test_datagen.flow_from_directory(
        test_dir,
        target_size=(150, 150),
        batch_size=20,
        class_mode='binary')

test_loss, test_acc = model.evaluate_generator(test_generator, steps=50)
print('test acc:', test_acc)
Found 1000 images belonging to 2 classes.
test acc: 0.938999991416931194%弱の正答率になりました。
モデルをTensorFlow.js用に変換する
モデルをTensorFlow.js用に変換します。
まずはtensorflowjsをインストールします。
!pip install tensorflowjsその後、モデルを変換します。
import tensorflowjs as tfjs

tfjs.converters.save_keras_model(model, '/gdrive/My Drive/tfjs')
これでGoogle Driveのtfjs/にTensorFlow.js用のモデルデータが出力されました。
GitHub Pagesを準備する
適当なGitHubリポジトリを準備します。
ここではtfjs-dogs-vs-catsという名前のリポジトリを作りました。
MatchaChoco010/tfjs-dogs-vs-cats
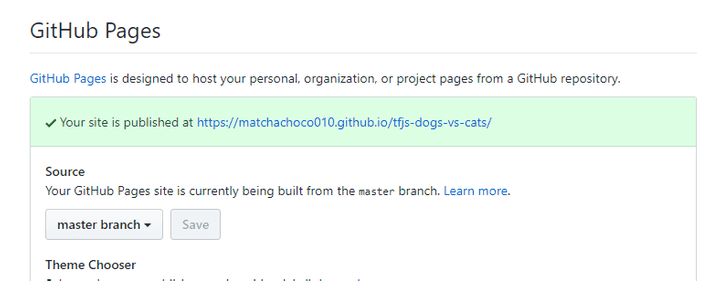
GitHub Pagesを有効にします。 SettingsからGitHub PagesのSourceをmaster branchにします。

これでmasterブランチの内容がhttps://matchachoco010.github.io/tfjs-dogs-vs-cats/に
GitHub Pagesとして公開されるようになりました。
Gitリポジトリ直下にさきほどのtfjs/をダウンロードしたものを配置し、
index.htmlとmain.jsを作成します。
tfjs-dogs-vs-cats
├─ tfjs/
├─ index.html
└─ main.jsindex.htmlを次のようにします。
<!DOCTYPE html>
<html lang="ja">
<head>
  <meta charset="UTF-8">
  <title>Dogs vs Cats</title>
  <script src="https://cdn.jsdelivr.net/npm/@tensorflow/tfjs@0.14.2/dist/tf.min.js"></script>
  <script src="main.js"></script>
  <style>
  canvas {
    border: solid black 1px;
    display: block;
  }
  </style>
</head>
<body>
  <h1>Dogs vs Cats</h1>
  <p>猫か犬の画像を選択してください。<br>正方形に近いほうが良さげ。</p>
  <canvas id="canvas" width=150 height=150></canvas>
  <input type="file" id="file">
  <div id="output"></div>
</body>
</html>
tensorflow.jsを読み込み、main.jsも読み込んでいます。
canvasとファイル選択用のinput、それに出力を表示するdivが用意してあります。
main.jsは次のとおりです。
function loadImage(url) {
  return new Promise(function(resolve, reject) {
    const img = new Image()
    img.src = url
    img.addEventListener('load', () => resolve(img))
  })
}

const modelPromise = tf.loadModel('./tfjs/model.json')

document.addEventListener('DOMContentLoaded', async () => {
  const canvas = document.getElementById('canvas')
  const ctx = canvas.getContext('2d')
  const file = document.getElementById('file')
  const output = document.getElementById('output')

  file.addEventListener('change', async () => {
    const dataURL = URL.createObjectURL(file.files[0])
    const img = await loadImage(dataURL)
    ctx.drawImage(img, 0, 0, 150, 150)

    const model = await modelPromise

    const prediction = tf.tidy(() => {
      let input = tf.fromPixels(ctx.getImageData(0, 0, 150, 150))
      input = tf.cast(input, 'float32').div(tf.scalar(255))
      input = input.expandDims()
      return model.predict(input).dataSync()[0]
    })

    if (prediction < 0.5) {
      output.innerHTML = `猫 ${100 - prediction * 100}%`
    } else {
      output.innerHTML = `犬 ${prediction * 100}%`
    }
  })
})最初のloadImageは画像を読み込んでPromiseを返す関数です。
function loadImage(url) {
  return new Promise(function(resolve, reject) {
    const img = new Image()
    img.src = url
    img.addEventListener('load', () => resolve(img))
  })
}

...その次にtf.loadModel()でモデルの読み込みを開始しています。
Promiseが返されるので、あとでawaitします。
...

const modelPromise = tf.loadModel('./tfjs/model.json')

...dom要素にアクセスするのでDOMContentLoadedにaddEventListenerしています。
最初に必要なdom要素を取得して、canvasの2dコンテキストも取得しています。
...

document.addEventListener('DOMContentLoaded', async () => {
  const canvas = document.getElementById('canvas')
  const ctx = canvas.getContext('2d')
  const file = document.getElementById('file')
  const output = document.getElementById('output')

  ...

})ファイルセレクト用のinputに対してchangeにaddEventListenerで
ファイルの選択のタイミングを監視しています。
ファイルが選択されたらcanvasにその画像を150×150サイズで描画しています。
document.addEventListener('DOMContentLoaded', async () => {

  ...

  file.addEventListener('change', async () => {
    const dataURL = URL.createObjectURL(file.files[0])
    const img = await loadImage(dataURL)
    ctx.drawImage(img, 0, 0, 150, 150)

    ...

  })
})
const model = await modelPromiseとすることでモデルの読み込みを待ちます。
document.addEventListener('DOMContentLoaded', async () => {
  ...
  file.addEventListener('change', async () => {
    ...
    const model = await modelPromise
    ...
  })
})TensorFlowの計算はtf.tidy()に渡した関数で囲みます。
tf.tidy()に渡した関数の中でアロケートされた変数などが、
その関数を終わるときに開放されるそうです。
tf.fromPixels()でcanvasに描画された画像をTensorFlowの変数として読み込みます。
その後、変数を255で割って0~1の値に変換しています。
この変数の形状は(150, 150, 3)ですが、
モデルが受け付ける形は(batch size, 150, 150, 3)なのでexpandDims()で拡張しています。
document.addEventListener('DOMContentLoaded', async () => {
  ...
  file.addEventListener('change', async () => {
    ...
    const prediction = tf.tidy(() => {
      let input = tf.fromPixels(ctx.getImageData(0, 0, 150, 150))
      input = tf.cast(input, 'float32').div(tf.scalar(255))
      input = input.expandDims()
      return model.predict(input).dataSync()[0]
    })
    ...
  })
})最後にpredictionの結果が0.5より小さければ猫、0.5より大きければ犬と表示しています。
document.addEventListener('DOMContentLoaded', async () => {
  ...
  file.addEventListener('change', async () => {
    ...
    if (prediction < 0.5) {
      output.innerHTML = `猫 ${100 - prediction * 100}%`
    } else {
      output.innerHTML = `犬 ${prediction * 100}%`
    }
  })
})